How to debug your Linux BSP
Debugging can be a tiring and repetitive process, fraught with difficulties and tiny mistakes that frustrate even the most experience programmer. This guide will take you through some of the fundamentals of debugging a Linux BSP and how solve some of the main problems that you will encounter when doing so.
Getting to the U-Boot command line
Firstly, getting to the U-Boot command line is fundamental, a whole host of things must be correct to get there. Clocks, memory, serial…: these are some of the things that need to be working before you talk to your board at all.
To debug quickly, try to create an environment where you can test successive U-Boot images with a fast turnaround. Debugging is the act of gaining more information, and at this stage the only tool you have is re-compiling, re-flashing (re-loading?), and re-running U-Boot. Create a setup that does all these things efficiently.
Keep notes of what you are doing, constantly going round the cycle of debug and not getting far can turn you stir crazy at times, and make you forget things you’ve seen. Let’s begin at the worst case:
Nothing is printed on the serial port
The first board arrives. You’ve tested that the power rails all come on OK. You connect the serial port, load U-Boot, cross your fingers and turn on the board. And… nothing, not a single character is printed.
The first thing to do is to try and turn on an LED. Find a section of code that is executed early, before the serial console is even brought up, and use it to turn on an LED (just use a raw memory access). If it works, great! If not then try moving it back through the execution chain as early as possible. If this doesn’t work, then U-Boot probably isn’t being loaded at all, and you need to consult your CPU documentation.
If you can turn on an LED, then maybe your serial port is not being configured correctly. Try turning your LED on after the serial port is configured, is it still turning on? Now you know your serial port initialisation isn’t crashing U-Boot entirely. Double check the serial port being used, double check rates, protocol, flow control. Get an oscilloscope or a logic analyser and test for activity on the lines.
If there is rubbish on the serial port, then perhaps there is an issue with the PLL configuration. Or the signal is inverted. Or you are just seeing noise from moving the connectors. Is the outputted signal transmitted as TTL or RS-232?
Once you have some sort of serial port communication established, things get a bit easier:
Prints stop short of reaching the command line
So there are prints occurring on the serial port, but it stops short of reaching the command prompt. Communication with your board is still a one-way street.
The only thing to do now is to determine why it stops there. The most important information is the last thing to be printed. By searching the source code, you should be able to find out where a certain string is printed. You will become adept at this skill through practise, which you will need as it is fundamental to debugging Linux BSPs (U-Boot and the Linux Kernel).
Once you have located the source of the last print, you will want to add more prints later in the execution chain. This will help you to gain more information about why the prints mysteriously stop working. The approach can almost always be used to reduce the possible location of the error to a single statement if required. It is time consuming, but this is why setting up your working environment to be efficient to this purpose is so important.
Eventually you will find the source of the issue, perhaps the memory is not being brought up correctly, or maybe a certain peripheral access causes a system wide crash. Be persistent, but remember that sometimes the mere act of adding prints to a system can cause timing changes that will artificially suppress an error. If you have time, always try to understand in full any failure modes that are observed, if you fix them without knowing why, they can sometimes come back to haunt you.
Booting Linux
So, you’ve reached the command line. But booting Linux does not work as expected. At least now, you can talk to your processor, U-Boot has many useful commands that allow you to probe memory, read filesystems and even fetch files from a network. Some of these commands will be needed to boot Linux, and they may not work for various reasons.
A peripheral needed for boot is not working.
To boot Linux, U-Boot will need to find various binaries (kernel, device-tree, filesystem) from somewhere. Generally, this somewhere is some sort of internal storage on the board, but it is just as valid to fetch things off the network.
U-Boot does things a little differently to Linux; for example, U-Boot’s driver support tends to lag a few months behind its bigger brother. Sometimes, your shiny new flash chip is simply not supported in the older version of U-Boot you are using, and you don’t quite realise this until boards are in house.
When this happens, there are a few things you can try. First, check the latest U-Boot upstream source code, things move fast in the open-source world, and you might find a nice new driver to backport. Second, you can try looking at the Linux source code, a driver found here will be a little harder to backport, and it depends on which subsystem the driver is a part of. Some will be easy, some will be next to impossible.
If all else fails, try scouring the internet, it might be the case that someone has submitted a driver for the chip in question, it just hasn’t been accepted and merged in yet. Sometimes this process can take months and then stop simply due to lack of interest on both parties; we have found patches years old that have proven to be useful for our purposes.
U-Boot claims to boot Linux but nothing happens
So, you see “Starting Kernel …” on the serial port from U-Boot, but then nothing happens. Another frustrating problem and it can feel like we’re back where we started with nothing printing on the serial port. To make things worse, we’re now blurring the line between debugging the U-Boot world and debugging the Linux world.
Typically, if there was obviously wrong with the images you have provided, U-Boot will complain noisily, and you will be able to debug the problem. What’s likely happened here is that Linux is booting, but it is not printing to the correct serial console. Double check the boot arguments in U-Boot (sometimes you need to set “console=ttyS0” or equivalent), double-check the kernel configuration you have used to build your kernel. If you have Ethernet enabled, plug in an Ethernet cable and see if the link lights come on, if they do then Linux is booting flawlessly and is only failing to print to the serial console.
Another thing that could be wrong is the LOADADDR specified was wrong. Some setups require you to specify this environmental variable when compiling the Linux kernel. If this is wrong, then U-Boot will quietly pass control to an improperly linked kernel, and the CPU will quickly fall over.
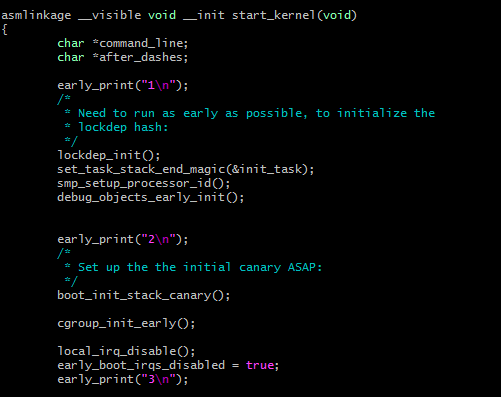
You may need to enable early printing, how you do this is highly dependent on your processor. On ARM you would enable CONFIG_DEBUG_LL. You’ll need to tell the configuration how to access the serial port system, and which one to use. This allow you to use the “early_print” function which should give you prints before the console is enabled. Try adding them into the start_kernel() function found in “init/main.c”.
Linux forever “waiting for root device”
Linux begins booting, you see a whole stream of boot log messages, but then it hangs forever on “Waiting for root device”. The first thing you’ll want to do is check your boot arguments in U-Boot, in a lot of cases, Linux requires U-Boot to tell it which device contains the root partition. It takes some skill and domain knowledge to know what the device will be called, but you can generally work it out either from first principles or trial and error.
For example, if you are booting from eMMC on an iMX6 device, which is attached to MMC port 4 in the hardware manual, and the root partition is number 1, then the boot arguments should contain “root=/dev/mmcblk3p1”. The way of working this out will be different dependent on your design and CPU architecture.
Any other boot problems
If there is any other sort of failure during the boot process, then try to analyse where the error is occurring. It could be a driver initialisation that fails and crashes the whole system. If you are really stuck, remove the driver from the kernel configuration entirely, returning to it at a later date.
The crash could also be occurring in the initscripts, which means your problem is now a combination of user space and kernel space. Try and determine which initscript (typically these are the scripts in /etc/init.d) is being executed as the crash happens.
Debugging drivers after boot
Once Linux is booting fully there is ordinarily still more work to be done getting all your drivers to work. You’ll want to use the same process of re-compile, re-run to find out why something isn’t working. Some drivers you can build as modules, which means you can re-run without having to reboot the board. Use this to your advantage and speed up your debug time.
Asking for help
Sometimes when you have a particularly difficult problem in your Linux BSP that you can’t solve, simply taking a break, or sleeping on it, can be enough to get you going again. Sometimes however, you will need to get help, and there are several ways you can go about this. You could ask a colleague in your organisation to look at it with you; often a second pair of eyes can solve these types of issues. Otherwise, you can look for support online: your CPU manufacturer will most likely have public forums where you can ask questions related to Linux BSP issues, if you think your problem is with the software more than with the chip, you could write an enquiry to the relevant mailing list.
If all else fails it might be worth hiring an expert to look into the issue for you. Here at ByteSnap, we have many years of expertise working on Linux BSP design, across a wide range of technologies and issues. Often, problems can arise again and again in similar ways, and the benefit of experience allows us to identify and quickly solve these. We can also provide off-site specially tailored training on all matters Linux BSP.
Also published on Medium
How can ByteSnap help you today?
From start-ups to blue chips, ByteSnap’s embedded systems developers are enabling companies to stay a step ahead by providing them with bespoke solutions. Maintain your competitive edge – contact us today and find out how we can optimise your product development!